Learn How To Use Elementor Popups
Let’s dive deep into the world of Elementor popups and unveil the secrets to harnessing their full potential! In this article, we…
Read article Skip to main content
Virtual conferences are nothing new, but the Covid-19 pandemic has made them more famous than ever. Nowadays, it is one of the best solutions for people who are far from each other. And as the demand for virtual conferences continues to accelerate. So, it’s a perfect time to start your virtual conference website. If you are trying to figure out how to advertise virtual conferences but don’t know how to start?
Let’s start. This complete guide will help you to find the information you need. By the end of the blog, you’ll learn how to advertise virtual conferences with WordPress like a pro!
Virtual conference means a digital environment in which you can feel visually and mentally but not physically. It used to bring people in different areas together to conduct business. Virtual conferences are now becoming more popular and accepted to develop and reach a large audience area. In short, it is a virtual reality that you can see, listen to, and communicate with but cannot touch.
WordPress has become one of the most reliable content management systems for quickly building your website. It comes with many plugins and themes that allow you to customize your website to your choice easily. The first thing that comes to mind is, can I use WordPress to organize a virtual conference? Yes, you can do that. It is possible with WordPress! Because WordPress can do anything, and it’s limitless. Integrating virtual meetings into your website is simpler than you might think if you use Eventify WordPress theme. There are many great options and will work out of the box.
Advertising virtual conferences isn’t that different from promoting a formal event. The main difference is that for a virtual event, you do not need to choose a venue. So, you can host your virtual conferences in less time. If you’re planning your virtual meetings, try these some best ways that help to advertise your virtual conferences.
Create an excellent one-stop well-designed event page where all people get information regarding your virtual conferences. On this page, give all the required details about your meeting. Plus, use eye-catching graphics, countdown conference time, past event videos, sponsors, speakers, and many more. If you choose a suitable theme for a virtual conference, you don’t face any difficulty with the advertisement.
You can include your speakers at your virtual conferences as event representatives. The secret to effective marketing is to make your virtual meeting a focus of attention at every chance you get, whether it’s online or by word of mouth. It’s for this purpose that adding special guest speakers into your marketing plan is essential. Sponsors and spokespersons are always the main attractions of virtual conferences, with people excited to hear from, engage with, and learn from them.
The countdown is a great way that creates an urgency to respond. It can help to convert those who are on the point of choosing whether or not to attend your virtual conference.
If you were successful in getting sponsors to help with the virtual conferences, you should consider how you can help in the promotion of your desired outcomes. That is, it’s in their better interests for the virtual conferences to attract the right audiences to complete their sponsorship goal. Promote your sponsors to advertise the virtual meetings on their websites, social media, and any other web content they provide.
It’s essential to time your advertising. You’re promoting your virtual conference at just the right time, not too early or too late. You risk losing the viewer’s attention if you do it too early, especially with the number of elements that presently surround your virtual audience. If you wait too long, your advertising might not even be able to attract a wide enough audience. Advertising your virtual conference 2-3 weeks before it goes live is a great idea.
We hope it helps!
Let’s go through each of the guides one by one. And learn to know everything you need to start advertising for your virtual conferences. Finally, we’ll explain to you how to work it!
Selecting a domain is an essential step in creating your virtual conferences. A domain name is typically one of the things people notice, and it can impact the way they view your website. A well-chosen domain name can attract users and provide them involved.
A website hosting provider’s main job is to get your website online on the internet so that others can see this. How quickly your site runs, how fast you manage downtimes and how your brand looks in the digital world are determined by your hosting. You can also harm your brand’s reputation if you don’t choose the perfect hosting plan.
Log in to your hosting account and use cPanel to install WordPress. WordPress is an open-source content management system with a lot of functionality. It also offers the ability to choose a theme, plugins, and templates to provide your virtual conference website with unique features and functionality.
To create a virtual conference website without writing a single line of code, install the Elementor plugin from your WordPress directory. Elementor is a drag-and-drop editor with a lot of features.
For your virtual conference website, there are many themes to choose from them. It was not easy to create a virtual conference website, but the “Eventify” theme provides excellent features to help you do so. This theme is also Elementor compatible.
The first step is to log into your WordPress admin dashboard. Next, go to the Appearance » Themes and click on the Add New. Now, click on the Upload Theme, upload the ”Eventify” theme zip file. This theme creates a virtual conference website.
For more information, please see the screenshot below.
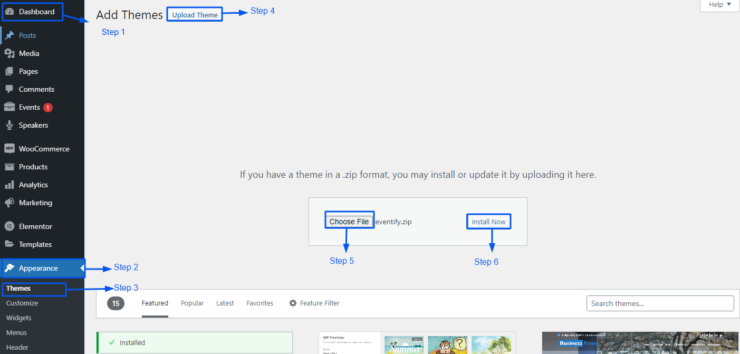
Once your theme installs, click on the “Activate Theme” button. Now, you have successfully installed and activated your WordPress “Eventify” theme, and it is ready for use.
Now, it’s time to create a new virtual conference. Go to your virtual conference website’s front side.

After that, click on the Create Event button.
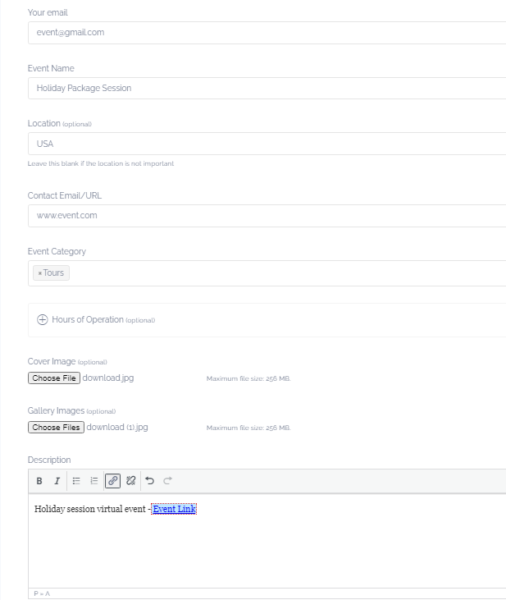
Here, you can see many fields. So fill in all of the information you need, like the event name, location, event category, and much more.
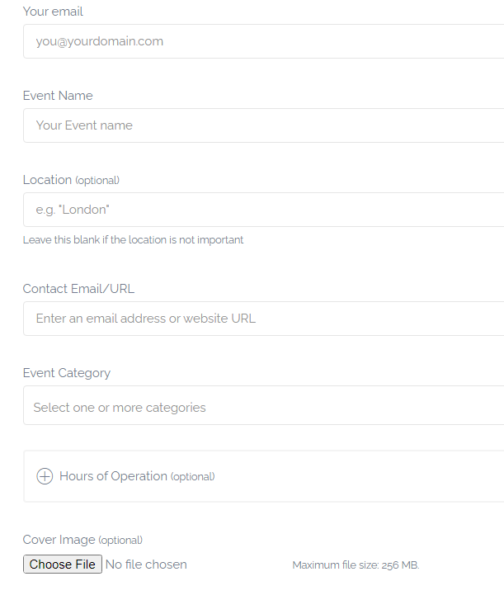
Let us quickly summarize all the required fields and add a virtual conference.
● Event Name: Write your virtual conference name.
● Location: Write a virtual conference location for your event. It is an optional field.
● Contact Email/URL: Set a contact email or URL for the virtual conference listing.
● Event Category: You can select a relevant virtual conference category in a drop-down menu.
● Cover Image: Set a cover image for your virtual conference.
● Gallery Images: Set a gallery image for your virtual meeting.
● Description: Add information about your virtual conference and give a live conference link.
● Website: Define the website URL.
● Phone Number: Enter your contact number.
● Video: If your virtual conference video is available, then enter a video link.
Once you have completed the virtual conference form, you can preview a submit form on the site.
Once you have completed the virtual conference form, you can preview a virtual conference what it will look like on the website.
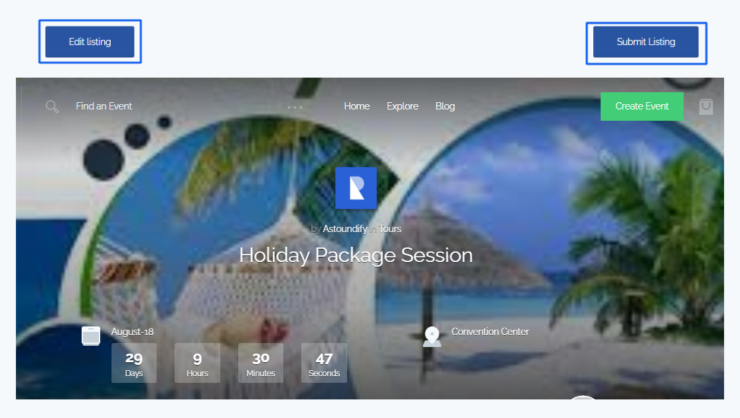
After clicking on the Submit Listing button, look at the screenshot below to show a message like this.

If you are a virtual conference website admin, go to your WordPress admin dashboard >> Events. Click on it. Here, you can show all the pending virtual conference listings. Click on the Approve button and live your virtual conference listing.
Also, if someone other than the site admin creates a conference, then it would need approval, and that virtual meeting would show in the pending list. Once approved, the virtual conference will be visible on the front end.

After approved the virtual conference; you can preview this virtual conference by visiting the front-end of your site:
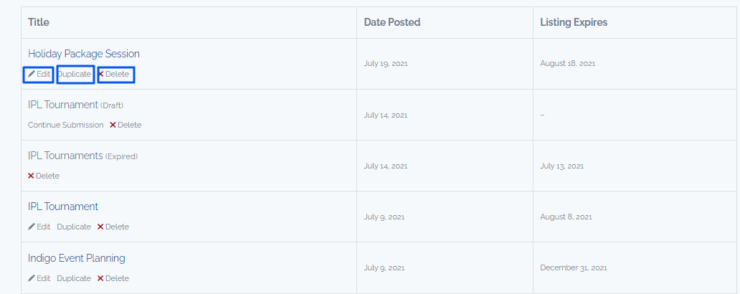
Here, you can directly show the entire virtual conference listing in your dashboard. You can see various options. Like; Edit, Duplicate, Delete.
● Edit: You can edit your virtual conference.
● Duplicate: If you want to create the same virtual meeting, then click on create a copy.
● Delete: You can delete your virtual meeting.
It’s a simple view of a virtual conference dashboard with all the possible options.
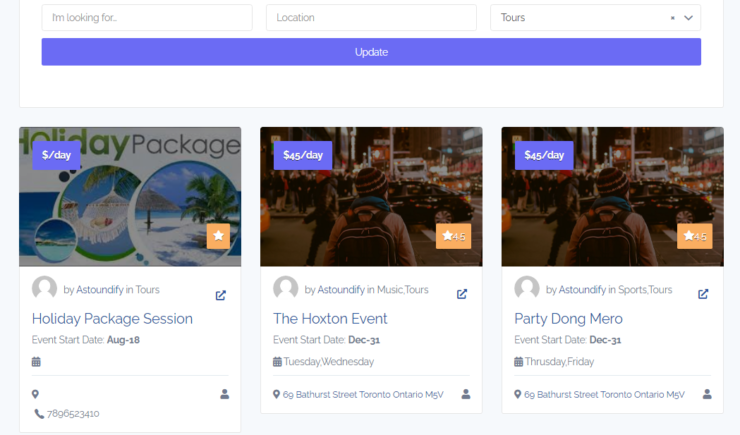
Here, you can search a virtual conference keyword-wise, location-wise, and category-wise.
Step 1: On the back-end side, you can see a Speaker’s menu. Click on it.
Step 2: Now, you can see the Add New Speaker button at the top of the page. Click on that button.
![]()
Step 3: Write a speaker name, add a description about the speaker, add a speaker’s social account details, and add a speaker image. After that, publish the page. Whenever users can add a new virtual conference, see all the speakers in a drop-down list and choose from there.
Step 1: On the back-end side, you can see a Products menu. Click on it.
Step 2: Now, you can see the Add New, Import, and Export button at the top of the page. Click on the button as per your requirements.
Step 3: Write a ticket name, add a description about the ticket, add a ticket’s price detail, add a ticket gallery image and add a ticket image. After that, publish the page. If you want to enhance the sell tickets functionality on your virtual conference website, you need to install WooCommerce Bookings and our Products plugin.
If you want to advertise your virtual conferences, make sure your website is both helpful and attractive. You will need to include features like countdown timers, speaker profiles, and payment choices. Thankfully, WordPress is a highly versatile platform that can support a broad range of themes and plugins. You can build a website in just a few minutes if you choose a good theme, add all the required features, and ensure that your audience doesn’t miss any relevant information.
Keep in mind, though, that the result depends mainly on the theme. Because with a suitable theme, you can always ensure you get a great audience response. That is why, when making your decision, you should prioritize outstanding customer support and robust features.
If you have any questions about advertising virtual conferences, share them in the comments section below.
Let’s dive deep into the world of Elementor popups and unveil the secrets to harnessing their full potential! In this article, we…
Read articleAre you tired of manually posting job listings on your website and sifting through countless resumes? Look no further than the WP…
Read articleElementor is a powerful page builder plugin for WordPress that makes it easy to create custom popups for your website. In this…
Read article Optimized by Seraphinite Accelerator